Friday, January 31, 2014
Hello from the 2010 Food Wine Classic in Aspen
 Ive just picked-up my press pass here at the St. Regis, ground zero for this weekends festivities. Todays itinerary includes an interview with PlumTV, the Opening Reception featuring Bravos Top Chefs, and then the much anticipated Wines from Spain BBQ, starring the one and only Jose Andres.
Not sure exactly when and what Ill be posting, so youll just have to stay tuned. If youre not already, be sure to head over to Twitter and follow @Foodwishes to get updates (and lots of them). Enjoy!
A memory test and the ultimate carrot cake
 |
| Carrot cake |
My favourite passtime is getting into a bookstore like Crossword or Landmark and spending hours browsing around. No marks for guessing which my favourite section is. Nowadays bookstore chains in India encourage to you to browse, sit down, relax, read as much as you want, without anyone bugging you. The Oxford bookstore at Churchgate (downtown Bombay) has a Cha Bar in the store, where you can order from an impressive variety of teas and the all time favourite potato wedges or fries (they serve fries as rings). They dont even mind you taking their books to your table and eating over a good read as most of us like to do at home. How they manage the greasy situations in the event of ketchup or chai or just oil getting on their pages is something I havent figured out.
Last week, I was loafing around at the Crossword bookstore. This big fat book of low-fat baking (what an irony!) by Linda Fraser, caught my eye. Linda Fraser has this other very popular book on Vegetarian cooking.
 Coming to this book, the size of it prohibited me from buying as cooking from a really huge book can be pretty cumbersome. One either has to copy out the recipe on the page or occupy half your counter space. While flipping through the pages, I saw this must-try carrot cake recipe. Memorising the ingredients and process seemed to be a good way to give my memory some exercise.
After reaching home, I tried to pull out the list of ingredients from my memory. The result of the memory test would be out only after we had tasted the cake. With my moms help, all the necessaries were laid out, assembled and baked into a truly yummy carrot cake. The only effort was in using my rusted memorising skills and ofcourse beating the eggwhites into stiff peaks. The rest of it was a breeze to make and delicious to eat. As Anupama put it, it is a homely kind of cake. Oh, and i did pass the test.
Low Fat Carrot CakePreparation time: 20 minutes
Baking time: 45 minutes
Makes 16 slices
Category: Cake, Low fat, Healthy baking
Recipe source: Low Fat Baking by Linda Fraser
1 cup all-purpose flour
1 cup whole wheat flour
3 tsp baking powder (it is 3 tsp, no mistake here)
1 tsp cinnamon powder
1 tsp all - spice powder (Optional, but if you have it, use it)
2 medium carrots - grated (to make roughly 2 cups)
Handful of raisins
4 tbsp cooking oil
4 tbsp milk
4 tbsp orange juice ( I used 8 tbsp milk as I didnt have orange juice)
3/4 cup sugar or more depending on sweetness of carrots
2 eggs - separated
Pinch of salt
Directions
Preheat oven to 180 C. Grease a 9" round pan with oil.
Microwave the grated carrot for 2 minutes and cool. (Optional)
Sift the two flours with the baking powder, salt and spice powders.
In a large bowl, beat the sugar with the yolks, oil, milk and orange juice until well blended.
Mix in the grated carrots and raisins. Gently mix in the dry ingredients. Do not overmix.
Whisk the egg whites with a tiny pinch of salt for 4-5 minutes, until you get stiff peaks.
With a rubber spatula, fold the egg whites gently into the flour mixture, such that all the air in the egg whites is incorporated into the cake. If you dont fold with a light hand, you will let all the air out, and the cake may not be as soft as it can be.
Empty the mixture into the greased cake tin, smoothen with the spatula and bake for around 40 minutes or until a skewer comes out clean.
Cool for atleast 15 minutes. Unmould and cut into slices of desired thickness. Serve warm with a glass of milk!
This is not a very fluffy cake. The carrots and raisins do make it dense but the baking powder and egg whites give it the springy texture. The spices balance out the bland sweetness of the carrots. I would recommend using orange juice for that slight tart taste.
Technorati tags: Carrot cake, healthy baking, low fat cake
Thursday, January 30, 2014
TACO BELL RED SAUCE CLONE RECIPE
I admit it, there are certain items that I really enjoy at Taco Bell. Yes, I know its not authentic Mexican food, but when you like something, well, you overlook things like that. One thing I enjoy at TB is a warm condiment called red sauce. It is not the hot sauce that comes in a packet; it is the steaming hot red sauce that is served on their tostados and their Mexican pizza. This recipe is about as close to the original taste as you can get!!!

1 (8 ounce) can of tomato sauce
1/3 cup water
¼ teaspoon chili powder
1½ teaspoon ground cumin
1½ teaspoons dry onion flakes
1 tablespoon white vinegar
½ teaspoon garlic powder
½ teaspoon garlic salt
¼ teaspoon paprika
¼ teaspoon white sugar
¼ teaspoon cayenne pepper
Mix everything and simmer (on very low) for 15-20 minutes. Serve hot. The "spice level" is very moderate if you use it right away. It is a little spicier if you let it sit in the fridge overnight.
Serve (as a hot condiment) with any Mexican food.
 NOTE: I was surprised to see that there is vinegar in this sauce (you cant taste it in the final product).
NOTE: I dont usually buy garlic salt. I just mix it up with 3 parts salt to 1 part garlic powder, stir well.
Read More..
1 (8 ounce) can of tomato sauce
1/3 cup water
¼ teaspoon chili powder
1½ teaspoon ground cumin
1½ teaspoons dry onion flakes
1 tablespoon white vinegar
½ teaspoon garlic powder
½ teaspoon garlic salt
¼ teaspoon paprika
¼ teaspoon white sugar
¼ teaspoon cayenne pepper
Mix everything and simmer (on very low) for 15-20 minutes. Serve hot. The "spice level" is very moderate if you use it right away. It is a little spicier if you let it sit in the fridge overnight.
Serve (as a hot condiment) with any Mexican food.
NOTE: I was surprised to see that there is vinegar in this sauce (you cant taste it in the final product).Chicken Fettuccine

(this is a picture of what the sauce should look like. I forgot to snap one of the finish product with the noodles)
Chicken Fettuccine
6oz pasta
2 Tablespoons olive oil
1/2 cup chicken
2 green onions (i use 3)
1 Tablespoon butter
1/2 Tablespoon thyme
1/2 Tablespoon garlic powder
2 cups heavy whipping cream
3/4 cup Parmesan
1/2 teaspoon salt & pepper
Heat olive oil over medium heat.
add chicken and cook 7 min. Than
add green onions, butter,thyme,garlic powder,heavy whipping cream,Parmesan cheese and salt&pepper
Cook on low-med for 30 min! its that easy!
lastly:
Boil the noodles(i use fettuccine noodles). but you can use whatever- pour it over noodles when done and your ready to eat.
I got this from my mother-in-law and its actually been a favorite meal around my house. Its quick and easy. Enjoy!!
Posted by: Jenny
The Punjabi Food Festival at Jamavar Leela Palace Bangalore

 |
Some of us bloggers and food writers were invited for the Chefs tasting table on occasion of the Punjabi Food Festival at the Indian restaurant, Jamavar, the Leela Palace. Chef Farman Ali, the Corporate Indian Chef at The Leela Palace Bangalore had designed the menu using his innovations on traditional Punjabi cuisine.
The menu was selected from the vast special menu thats out for the two week Punjabi Food Festival from 13th May-26th May. Jamavar has four food festivals in a year, two showcasing North Indian cuisine & two from the South.
The current festival gives the food connoisseur a wide range of Punjabi dishes to choose from - both vegetarian and non-vegetarian. We started the meal with a refreshing Ambi Panna- a raw mango drink before moving on to starters. Theres also the thandai and a variety of shorbas to start the meal with.

The vegetarian spread of starters comprised of palak di tikki, paneer amritsari, and gande di bhaji (onion fritters). This Palak tikka was like no other Ive ever tasted. Soft inside with bites of corn for texture, crisp on the outside and the roasted tomato chutney on the top not only provided a brilliant contrast of colour but also of flavour.
 |
| Palak Di Tikki |
Tomatoes roasted in the tandoor and ground with a mix of spices for the perfect balance of sweet, sour and spicy was what made this chutney extra special with great depth of flavour. If there is one thing you must taste from their special menu, Id recommend this one. The other starters recommended by the chef are tandoori kukkad di chaat (tandoori cooked chicken tikka tossed with chutney and vegetables), jheenge de pakore (tiger prawns marinated in a tangy masala coated with gram flour & deep fried), machhi de tikke (fish tikka).

In the vegetarian main course, we got a taste of curries showcasing different flavours and textures. Amritsari vadi paired with potatoes in a spicy-tangy sauce, the legendary sarson da saag with generous quantity of white butter (they didnt leave out the extra butter and jaggery when serving this), and the simple home style gobhi mutter where big florets of cauliflower mingled with plump green peas in a delicately spiced mix. Some of the other options from the extensive festival menu are Jheenga kadai, Kukkad Sarson da, Lobster masala, Bharmay Kareley and Bharwaan Guchchi Kesari. Of course, no self respecting Punjabi menu is complete without the ever popular Mah Ki daal, tasted as luxurious as the silver cups they were served in.

Whats a festival meal without some sigh-inducing desserts! Punjabi cuisine has some lesser known desserts like badam te gurh da halwa (almond-jaggery fudge), Pinni Nabha Di (sweet made using udad dal & dried fruits which were served as a part of the tasting plate. Also served were the ever popular desserts like kesar pista kulfi, jalebi-rabdi and a slice of fruit. Chef Farman Ali was also talking about Haldi ka halwa something Ive never heard of, where fresh turmeric is ground and roasted in ghee before proceeding to make a halwa with it. This is not a part of the menu, just the constant innovation the chef tries to bring in by introducing ancient foods to the modern palate.
The special menu also has set menu options at INR4000/person comprising of 3 starters, 4 mains, roti, rice and desserts.
To check the whole bunch of pictures from the Chefs table I attended - click here (Facebook album)

Details:Jamavar, Leela Palace, 23, Airport Road, Bengaluru
Punjabi Food Festival from 13th May-26th May 2013
Open for lunch & dinner
For Reservations, call 080-3057 1344 / 1234
Meal for 2 - Approx INR5000
Wednesday, January 29, 2014
SANDRAS INDIVIDUAL BEAN and VENISON SAUSAGE STEW

Posted: by Sandra
Prep: 5 Mins. |
Cook: 30 Mins.
INGREDIENTS:
***Bean and venison sausage stew:
1 lb. ground venison sweet italian sausage
1 spanish onion, finely chopped
2 cloves garlic, minced
5 cups low-sodium chicken broth
1 cup beer, (I use Alaskan Amber), or dry white wine, or more broth
1 (14.5 oz. can) diced tomatoes, undrained
2 (14.5 oz. cans) of cannellini beans (white beans), drained and rinsed
3 tablespoons balsamic vinegar
Freshly ground pepper to taste
***Bread topping:
2 tablespoons butter, melted
¼ cup fresh parmesan cheese, grated
¼ cup seasoned breadcrumbs
1 tablespoon finely chopped fresh flat-leaf parsley
--Prepared warm crispy bread or cornbread
METHOD:
***Prepare the bean stew:
In a large high-sided skillet, heat to medium-high heat. Add the ground venison sausage, onion, and sauté until sausage is browned. Add the garlic and sauté for 30 seconds longer. Add the broth, beer, drained tomatoes and beans. Bring to a simmer, cover, and cook for 20 minutes. Smash half of the beans with a masher to create a creamy consistency. Add the balsamic vinegar, and ground pepper, to taste; cooking, uncovered, for 3 minutes longer.
Preheat the broiler.
Transfer the stew evenly among six ovenproof ramekins.
***Prepare the topping:
In a small bowl, combine all the topping ingredients, and sprinkle evenly over the top of the stew in each ramekin. Place ramekins on baking sheet, and broil in the oven, just until the breadcrumbs are slightly browned, 2 to 3 minutes (watch carefully so the topping does not burn). - Enjoy!
The Webs Most Camera Shy Chef Introduces YouTubes New Moderator Feature!
YouTubes "Moderator" feature allows a YouTube publisher (me) to collect commentary, questions, or ideas (hopefully in the form of very creative videos) on our channel, and then watch the best ones rise to the top, as voted on by the Food Wishes faithful.
To celebrate the launch Im running the first ever official Food Wishes contest, called "The Summer of You." What is that, and how do you play? Watch the video, and then do what the guy with the mustache says. Enjoy!
If you would like to submit an idea, click here! Good luck, and please, no side bets.
Read More..
To celebrate the launch Im running the first ever official Food Wishes contest, called "The Summer of You." What is that, and how do you play? Watch the video, and then do what the guy with the mustache says. Enjoy!
If you would like to submit an idea, click here! Good luck, and please, no side bets.
Tuesday, January 28, 2014
Barbecue Chicken Breast and Grilled Vegetable Salad

Here is a classic example of using up whatever happens to be available in the freezer and refrigerator without having any idea of what the result will be. It was late and I had no plan for dinner, but I was leaning in the direction of a dinner salad. It was also one of the first really summer like evenings we have had so far this Spring and, having just cleaned the grill, I wanted to put it to good use. I always have lettuce and standard salad fixings available because I have some form of a salad almost every night. Boneless skinless chicken breasts are also one of the basic items I always keep in the freezer because they are incredibly versatile and very quick to thaw. The only items not normally in the vegetable crisper is this beautiful baby zucchini and the tiny super sweet peppers. I saw them in the market recently and could not resist.
To create this dinner salad, I combined lettuce, cucumber, onion and cheese in a large mixing bowl and tossed it with dressing. I grilled the chicken breast, zucchini and sweet red peppers until the chicken was cooked through, about 10 minutes per side, and the vegetables until they were tender but still had some texture. I plated the salad greens first and topped them with the sliced chicken breast and grilled zucchini and sweet peppers.
A few quick tips. When the weather starts getting warm, keep you salad greens in the refrigerator until the last possible second, just before sitting down to eat. Even if you prepare the salad in advance, store the whole thing, bowl and all, right in the refrigerator. That way, your salad is sure to stay cold and crisp and not turn into a wilted luke warm pile of icky green leaves. Secondly, when grilling boneless skinless chicken breast, or any other type of chicken, turn down the heat. Grilling over too high of a flame will result in flare ups which will torch the outside of the chicken leaving it burnt on the outside and raw on the inside. A more moderate heat will ensure even cooking while still creating that great crust that we all love from grilled food. Finally, when grilling vegetables, I find it works best to keep the vegetables as whole as possible and, if necessary, cut them down after grilling. This reduces the chances that the vegetables will fall between the grates, will also ensure a more even cooking and prevent your vegetables from burning or over cooking and turning to mush.
White Makhni Karahi
White Makhni Karahi

Ingredients:
- Chicken ½ kg
- Yogurt 1 cup
- Butter 50 gm
- Onion paste 1 cup
- Oil ½ cup
- Black pepper (crushed)1 tsp
- Salt 1 tsp
- All spice powder ½ tsp
- Cumin seed (crushed) 2 tsp
- Ginger garlic paste 2 tsp
- Lemon juice 2 tbsp
- Green chili paste 4 tbsp
Method:
- First fry ½ kg chicken in ½ cup of oil and take it out once fried. Add in onion paste in the oil along with 2 tsp ginger garlic paste, 1 tsp salt, 2 tsp crushed cumin seeds, 1 tsp crushed black pepper, 1 cup yogurt and ½ tsp all spice powder. Cook it. Then add in fried chicken and ½ cup cream. Cook it on a low flame for 10 minutes the add 50 gm butter and simmer. In the end add in 2 tbsp lemon juice and serve.
Monday, January 27, 2014
Tagliatelle with Rich Three Meat Sauce


Servings: 4
Prep Time: 10 minutes
Cooking Time: 30-45 minutes
Ingredients:
- 4 tbs. olive oil, extra for drizzling
- 3 ounces of pancetta (or lean bacon), diced
- 1 onion, chopped
- 1 garlic clove, minced
- 1 carrot, chopped
- 1 celery stalk, chopped
- 1/2 lb. ground venison
- 1/4 cup of chicken liver, chopped
- 1 cup of crushed tomatoes
- 1/2 cup dry white wine, like Pinot Grigio or Chardonnay
- 1 cup beef stock
- 1/2 tbs. dried oregano
- 1 bay leaf
- 1 lb. dried tagliatelle (pasta)
- salt and pepper, to taste
- grated Parmesan cheese, for serving
Pancetta is basically Italian bacon. Find it at your local Italian deli. You can also find it at some regular grocery stores.

1. Over medium-heat, heat 4 tbs. of olive oil in a large heavy-bottom saucepan. Add chopped pancetta and cook for 3-5 minutes, or until just turning brown. Stir occasionally.

2. Next, add chopped onion, carrot, celery and minced garlic. Cook for another 5 minutes, stirring occasionally.

3. Then turn the heat up to high. Add ground venison and cook for 5 minutes, or until browned. Break up meat with a wooden spoon.

4. After venison is browned, stir in chopped chicken liver. Cook for 2-3 minutes, stirring occasionally.

5. Then, pour in 1 cup of beef stock and 1/2 cup of dry white wine...


1/2 tbs. of dried oregano...

And 1 bay leaf. Add salt and pepper, to taste. Bring to a boil, then reduce to a simmer. Cover and simmer for 30-45 minutes, or until sauce reaches desired thickness.

6. Meanwhile, bring a pot of lightly salted water to a boil. Add the tagliatelle pasta. Bring back to a boil. Cook according to package directions until tender but firm, al dente.
Dried tagliatelle pasta look like little "nests."

In packages that look like this.

Drain cooked pasta and transfer to a warm serving bowl. Drizzle with olive oil and toss well.


Toss again. Serve immediately with grated Parmesan.
Thanks for looking, everyone! Remember to share Food for Hunters with all your hunting buddies.
"Print" friendly button at the very bottom of this post.
Chicken Tetrazzini
 |
I used only 4 tbsp of butter (the recipe called for 9!!!), only 2 cups of milk, no cream and about 2 - 2 1/2 cups of chicken stock. It actually worked excpet leftovers are a little too try for my liking. Im sure if I loaded up on all that creamy goodness it would have been fine. I added about a cup of chopped artichoke hearts which I thought was great! Id love to make something like this with more artichoke hearts - Yum! One thing I cannot understand about this recipe. Why is this made with a long pasta instead of something short like penne, rigatoni, ziti? I think I would have been happier with that. Steve kept trying to twirl it (probably to make me crazy) but its baked, its supposed to be compact which is NOT twirlable my dear!!! :-)

I am going to post the original recipe and you decide if you want to incorporate my changes above. If you do make the full fat version Id like to know if it made a difference with your leftovers. Take a look at this recipe from Giada.
Chicken Tetrazzini
by Giada De Lauretiis
Ingredients:
9 tablespoons butter
2 tablespoons olive oil 4 boneless skinless chicken breasts
2 1/4 teaspoons salt
1 1/4 teaspoons freshly ground black pepper
1 pound white mushrooms, sliced
1 large onion, finely chopped
5 cloves garlic, minced
1 tablespoon chopped fresh thyme leaves
1/2 cup dry white wine
1/3 cup all-purpose flour
4 cups whole milk, room temperature
1 cup heavy whipping cream, room temperature
1 cup chicken broth
1/8 teaspoon ground nutmeg
12 ounces linguine 3/4 cup frozen peas
1/4 cup chopped fresh Italian parsley leaves
1 cup grated Parmesan
1/4 cup dried Italian-style breadcrumbs
 Directions:
Preheat the oven to 450 degrees F.
Spread 1 tablespoon of butter over a 13 by 9 by 2-inch baking dish. Melt 1 tablespoon each of butter and oil in a deep large nonstick frying pan over medium-high heat. Sprinkle the chicken with 1/2 teaspoon each of salt and pepper. Add the chicken to the hot pan and cook until pale golden and just cooked through, about 4 minutes per side. Transfer the chicken to a plate to cool slightly. Coarsely shred the chicken into bite-size pieces and into a large bowl.
Meanwhile, add 1 tablespoon each of butter and oil to the same pan. Add the mushrooms and saute over medium-high heat until the liquid from the mushrooms evaporates and the mushrooms become pale golden, about 12 minutes. Add the onion, garlic, and thyme, and saute until the onion is translucent, about 8 minutes. Add the wine and simmer until it evaporates, about 2 minutes. Transfer the mushroom mixture to the bowl with the chicken.
Melt 3 more tablespoons butter in the same pan over medium-low heat. Add the flour and whisk for 2 minutes. Whisk in the milk, cream, broth, nutmeg, remaining 1 3/4 teaspoons salt, and remaining 3/4 teaspoon pepper. Increase the heat to high. Cover and bring to a boil. Simmer, uncovered, until the sauce thickens slightly, whisking often, about 10 minutes.
Bring a large pot of salted water to a boil. Add the linguine and cook until it is tender but still firm to the bite, stirring occasionally, about 9 minutes. Drain. Add the linguine, sauce, peas, and parsley to the chicken mixture. Toss until the sauce coats the pasta and the mixture is well blended.
Transfer the pasta mixture to the prepared baking dish. Stir the cheese and breadcrumbs in a small bowl to blend. Sprinkle the cheese mixture over the pasta. Dot with the remaining 3 tablespoons of butter. Bake, uncovered, until golden brown on top and the sauce bubbles, about 25 minutes.


Sunday, January 26, 2014
Sweet and Sour Chicken
Crock Pot Sweet and Sour Chicken-Pork or Beef
You know what s great about this recipe not only is it delicious, but these ingredients can be used for chicken,pork and beef! Theses make tasty burritos or tacos! Please try them! You wont be disappointed.
1 Cup Coke
1 Cup Brown Sugar
1 Cup red enchilada sauce
1 small can diced green chilies
4-6 choice of you meat (chicken, beef or pork)
Throw everything in the crock pot and cook on low for 6-7 hours!
I really tried to take a picture of this but it looked horrible! so sorry no picture for this one
Posted by Jenny
Saturday, January 25, 2014
How to Poach Eggs Better Late Than Whenever

So, its safe to say, this video recipe was truly "by popular demand." And by "demand" I mean constant harassment, and good-natured threats, or at least I hope they were good-natured. The lesson here is to never promise anyone anything.
In related news: Im not saying exactly when, only that it will be in the future, but the breakfast I used as a destination for my poached eggs will also be turned into its own video recipe for a sort of hollandaise-less eggs Benedict, so stay tuned for that.
Anyway, this is fairly straightforward stuff, except for the fact that the really, really fresh eggs I bought to show how amazingly well they hold together in the hot water, were anything but. As youll see, they spread out faster that a group of food bloggers in a free grand tasting tent. Enjoy!
Ingredients:
For 2 quarts of water
1 teaspoon vinegar
1/2 teaspoon salt
fresh eggs!
View the complete recipe
View the complete recipe
Aloo potato Ke Puffs
.JPG)
INGREDIENTS:
- Boiled Potatoes 4 medium
- Onion finely chopped 2Tspns
- Ginger-Garlic paste 1/2Tspn
- Rai 1/2Tspn
- Zeera 1/2Tspn
- Dried Red chillies 4
- Green chilles 4
- Chane ki dal 1Tspn
- Curry Leaves few
- Coriander Leaves 1/2 bunch
- Turmeric powder 1/4th Tspn
- Lemon(nimbu) 1
- Puff Pastries
- Oil
- Salt to taste
METHOD: For the stuffing:
- Boiled Potatoes 4 medium
- Onion finely chopped 2Tspns
- Ginger-Garlic paste 1/2Tspn
- Rai 1/2Tspn
- Zeera 1/2Tspn
- Dried Red chillies 4
- Green chilles 4
- Chane ki dal 1Tspn
- Curry Leaves few
- Coriander Leaves 1/2 bunch
- Turmeric powder
- Heat 2Tbspns of oil in a kadai and add Onions and fry them to light brown colour and add ginger-garlic paste and keep frying.
- Add Rai,Zeera,dried red chillies,green chillies,curry leaves and fry for 2mins.
- Add potatoes,Turmeric powder,Salt and coriander leaves.
- Fry till the Potatoes start sticking the kadai.
- Lastly add lemon and switch off the stove after 1minute.
For the pastries:
.JPG)
- Take out the pastries from the refrigerator 15mins before stuffing them.
- Beat an egg and keep aside.
- Put 2Tspns of stuffing in the middle of the puff pastry and seal the ends with water.
- Now coat the pastry with egg.
- Place the pastries in oven and cook for 45mins
- Till the pastries turn Golden brown.
- Serve with tomato sauce or any chutney.
Veggie Pizza Rerun

Like I have said before, I can only go so long without a repeat, despite by best efforts. I originally tried out this Vegetable Pizza on January 31 and it was one of the best dinners so far this year. It was requested again last night so here is the reprise. If you missed it the first time, and would like the recipe, please refer back to my January 31 entry for all of the information you need. If you do have any questions, however, please feel free to email or comment here and Ill be happy to assist!
Friday, January 24, 2014
Gulatti
Gulatti

Ingredients:
- Khoya ½ kg
- Rice ½ kg
- Cardamom 4-6
- Cinnamon 1 inch piece
- Clarified butter ½ cup
- Sugar 125 grams
- Pistachios/almonds for garnishing
Method:
- Boil rice and keep aside.Heat clarified butter. Add cinnamon, cardamom powder and khoya. Fry till the mixture turns golden brown in color.Then remove the khoya and keep aside.
- In the same clarified butter add sugar and 1 cup of water and cook till the sugar dissolves and syrup is formed.Add rice and simmer for 10 minutes.
- Now add khoya , mix gently and simmer for another 5 minutes.Garnish with sliced pistachios and almonds .
Methy samosy
Methy samosy

Ingredients
- Flour 250 gm or 2 cups heaped
- Ghee ½ cup
- Salt pinch
- Luke warm water to knead
- Ghee to deep fry
Ingredients for Filling
- Almonds grinded ½ cup
- Pistachio grinded ½ cup
- Fresh grated coconut 2 cups
- Poppy seeds 2 tbsp
- Sugar 1 cup
- Semolina 4 tbsp
- Milk ½ cup
- Green cardamom powder ½ tsp
Method for filling
- Dry roast semolina, poppy seeds, mixed with coconut, almonds and pistachio, sugar, milk, green cardamom, leave it on dum for 10 minutes, cool and use.
Method for samosay
- Sieve flour and salt, rub in ghee, mix slightly, slowly knead with Luke warm water into a smooth dough, cover and leave to rest for 30 minutes, make into small balls, roll into small puri, fill with filling, fold into a D shape, pinch the edges well, deep fry light golden.
Thursday, January 23, 2014

Extra Mayo
Im back in San Francisco, and tomorrow Ill finally post the long-promised, updated homemade mayonnaise technique. Homemade mayo was one of our earliest and most popular videos, and Ive wanted to do a new and improved, high-res version for years. Stay tuned!

Read More..
Wednesday, January 22, 2014
Petite Filet Garlic Bread and Salad of Pears Pecans and Vermont Cheddar
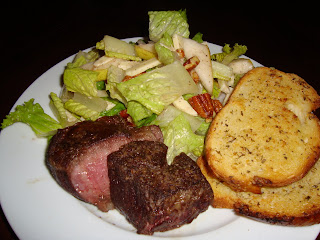 Every now and then, nothing satisfies that way a perfectly cooked steak can. Admittedly, filet mignon is probably not the cut of beef that most people would choose when feeding a family of 5 on an ordinary weeknight. However, it can most definitely be a realistic alternative for those times when you feel like splurging a bit, though still not breaking the piggy bank!
Filet is most often my steak of choice because they are portioned to a reasonable serving size, they are extremely tender requiring little preparation, and are still substantial enough to handle a marinade. One of the best ways to purchase the traditionally more expensive cuts of meat is to purchase in bulk from your local warehouse where the savings is substantial over the mainstream grocery store chains. The key is buy in large quantities and repackage at home into individual servings and store in the freezer for use at your convenience. They are very easy to thaw in the refrigerator overnight or even in the microwave immediately prior to cooking and serving.
I seasoned this 6oz. filet with salt and pepper only on all sides and heated a heavy bottom oven proof saute pan over med high heat until a tablespoon of olive oil just starts to smoke. Cook the steak on both sides approximately 3 minutes each and transfer the pan to a preheated 425 degree oven for approximately 5-8 minutes for rare and 8-10 minutes for medium. Remove from pan and allow to rest on a serving plate for 10 minutes prior to carving.
Steak and salad are a classic combination. For this salad, which is the perfect combination of flavors and textures, I combined freshly washed and chopped romaine lettuce with thinly sliced sweet onion, still warm just toasted pecans, extra sharp Vermont cheddar and slices of the sweetest ripe Bartlet pear. This salad was dressed simply with red wine vinegar and extra virgin olive oil. Delicious!
The perfect steak dinner most always includes a great garlic bread. This technique is simple and delicious and can be altered to include fresh herbs and Parmesan cheese if you like. Combine 2 tablespoons of softened unsalted butter, 2 cloves of minced garlic, 1 tablespoon of olive oil, 1/2 teaspoon dried oregano (optional, but I LOVE it!), a tiny pinch of cayenne pepper and salt and pepper. Slather on both side of thick sliced Italian bread and bake in the oven at 425 degree for approximately 10 minutes on each side or until browned and crisp.
Please try these techniques in your own kitchen and feel free to share you thoughts. Questions are also welcomed here! Heres hoping to inspire you to prepare an easy and delicious meal tonight for you and your family.
Cupcake Apron Giveaway Results
Youll all remember this apron that CSN stores provided me to giveaway:

Well the results have been tabulated, and while it was a tough race, only one of you truly came out on top. The lucky winner is...
Southern Princess!!

Congratulations Southern Princess! Please reach out to me (heraldmd@gmail.com) to claim your prize!
Keep checking back for more giveaways--you can expect more of them starting next month!
Tuesday, January 21, 2014
Fettuccine Milano
FETTUCCINE MILANO
Carrabbas Copycat Recipe
1 tablespoon clarified butter
6 shrimp
pinch of salt and white pepper
pinch finely chopped garlic
1/4 cup diced tomatoes
1/4 cup sliced mushrooms
heavy pinch of scallions
5 ounces fettuccine
Saute sliced mushrooms in a little olive oil. Add pinches of salt and black pepper. Heat 1/2 ounce clarified butter. Add shrimp, rubbed with white pepper and salt. Cook for one min. Add shrimp, fettuccine, mushrooms, and remaining ingredients into saute pan with Alfredo. Ladle 1/2 cup of Alfredo sauce into saute pan. Heat until it starts to boil.
To clarify butter: Melt butter over low heat. When melted, remove from heat, and set aside for several minutes.
Subscribe to:
Comments (Atom)